Monday, January 30, 2012

Up & Down, Add & Subtract – Elevator Math!


At the library, I stumbled on a wonderful math word problem book – Arithme-Tickle by J. Patrick Lewis. The first problem in the book is about a mailman that rides the elevator up and down delivering letters and packages. Readers have to use their math skills to figure out what floor he eventually ends up on.


It was the inspiration for this little game - Elevator Math!!


What You Need
24-floor skyscraper picture (download it here)
Lamination
Fine-tip dry-erase markers
2 regular dice
1 adapted UP and DOWN die (visit my Slide-A-Story activity for a download)
Notebook paper and pencil (optional)

Prep
To play, write six destinations on different floors of the laminated skyscraper (e.g. swimming pool, vet, chocolate shop, toy store, art studio, cheese factory, cafeteria, karate dojo, etc.).

Objective
See how many of the special destinations you visit while “riding” the elevator 11 times.

Play
Roll the two regular dice. Add the dots together. Roll them again and add all the dots together. The total of these four dice rolls equal the floor that you start on.

Next, roll the three dice. Add the dots on the two regular die together and, if the third die reads “UP,” add the totaled number to the floor number you are on; if the other die reads “DOWN,” subtract the number from the floor number you are on. Then, color a window on that floor and make a tally mark. Roll the three dice 9 more times until you have 10 tally marks on your skyscraper page, adding/subtracting and coloring the floors.


THE ROOF/BASEMENT: If the player ends up on the roof or in the basement, have him/her circle the word “roof” or “basement.” When on the roof, there’s only one way to go: down. The opposite is true for a player stuck in the basement. A total of the two regular dice determines how far up/down the player goes. For example, if the player is stuck on the roof and rolls a seven, they’ll descend 7 floors to floor 17.

My son has played this game three times since I made it. Even though it's as much a game in pretend as it is a math exercise, my son was thrilled this last time to finally "pay a visit" to LEGOland!

Friday, January 27, 2012

Magnetic Snowman Hangman [Spelling Practice]


Okay, okay, so my son didn’t really hang our snowman (that's kind of morbid), but he did build it gradually with each letter he guessed incorrectly in my mystery word. I began with a few of the spelling words my son’s teacher sent home and progressed to a few words of my choosing – the current season (winter) and a favorite toy (ninjago).

To make our game, I created a snowman body and some attire. (Download a 1-page PDF of the snowman I made here.)


Then, I printed them on a sheet of sticker paper and attached it to an 8½- x 11-inch piece of magnet paper (a 3-pack runs about $5 at local craft stores). 

The magnet paper is thin enough to cut through so I got busy with the scissors cutting all of the shapes out. 

Yes, the stick arms ARE a pain to cut out, but it's totally worth it.

One of the shapes I made is an oval game label. It worked perfectly to hold a piece of notebook paper on our refrigerator. 

On the paper were the blanks I’d drawn, one for each letter in the word I was thinking of.

Under the blanks, I recorded the letters he guessed that weren’t in the mystery word (to keep him from guessing them twice).

I’m not going to lie; I gave him hints – sometimes the number of vowels or other clues – to keep him from getting frustrated.

This was so much fun!


NOTE: Our printer’s color ink was pretty depleted, hence our snowman has a pink carrot nose and blue (instead of green) scarf. We still think he's pretty cute though.

Wednesday, January 25, 2012

Painting with Markers (Georgia O’Keeffe-inspired Art)


There is something so bold about Georgia O’Keeffe’s paintings. Her larger than life depictions of flowers, desert hills, and animal skulls are simple, yet stunning. To teach my son a little about her phenomenal work and life, we created our own flower art.

First, we read the book My Name is Georgia by Jeanette Winter. Not only does this book share the story of O’Keeffe’s life, but it also has an underlying message that is so important to convey to kids: it’s okay to be different. An excerpt follows.

I did things other people don’t do.
When my sisters wore sashes – I didn’t.
When my sisters wore stockings – I didn’t.
And when my sisters wore braids –
I let my black hair fly.


This “don’t give in to peer pressure” lesson was such an unexpected (and pleasant) surprise; I planned the activity to be all about art, but it was so much richer thanks to Winter’s portrait of Georgia O'Keeffe.

When we finished reading, we embarked on our own kind of flower paintings. Freehand drawing is a bit of a struggle for my son. To keep him from getting frustrated, we used some homemade stencils. (Print the pattern I used here.)


First, I cut a heavyweight piece of acetate paper (like what you’d use on an overhead projector) that I purchased from the copy service department at OfficeMax into fourths. Then I cut petal shapes out of each section of the paper using an Exacto knife.

Next, my son grabbed his thick Crayola markers in “pretty” colors and a piece of paper.

I had him to draw the center of his flower in the middle of the paper, approximately the size of a quarter.

Then I gave him the acetate sheet petal stencils. He positioned his choice of petals next to the flower’s center and used the marker to draw a thick line around the outside edge of the petal, on top of the stencil.

I gave him a stiff-bristled brush, and told him to brush the marker on the stencil in towards the center, picking up the brush after each swipe. 

The color from the marker was swept into the center of the stencil, creating a wonderful texture!!

When done, he picked up the stencil and was amazed at the effect our "painting" technique had created. 
After repositioning the stencil, reapplying the marker, and brushing it in toward the stencil’s center several more times, he had enough petals to complete the flower.

I couldn’t resist and made one too. Aren't they beautiful?

Monday, January 23, 2012

A Music Measure of Math


Aside from an appreciation for music, I have no other knowledge of it or possess any talent myself. My son's music teacher’s “tee tee tah” lesson on music notes had my son trying to teach me, though. 

His curiosity became mine too. 

To help him learn the names of the music notes and practice some math, I designed this fun activity.

Download the music measure mat, cheat sheet, and notes/rests cards here.

The objective? See how many different combinations of notes can be used to create a measure of music with a 4/4 time signature.


I made some “note” cards and a cheat sheet that showed all the notes and rests and the number of beats each has.


After cutting the cards and taping together the music measure mat, my son sorted the cards into piles. Then I told him that the top number in the time signature (4/4) told us that each measure of music should have four beats. Each note does not have 1 beat, some have as little as a half beat, others as much as 4 beats.

I told him to fill the measure with notes and rests that added to four beats. He started with the easiest combinations: 1 whole note and then four quarter notes. But they got progressively harder.


I had to explain that two half beats equal one beat (I used an apple cut in half to show how two halves equal one whole). Then, the fun really began – using the eighth notes and eighth rests! More and more cards were laid down.

This was a great way to boost my son’s music vocabulary and work on counting, addition, and fractions. We made LOTS of different combinations of notes and rests that added to four beats. I lost count after he created 13 measures!

Friday, January 20, 2012

Eagles: Lesson and Snack


My husband and I read to our two sons every night at bedtime. The latest chapter book I have been reading to my oldest son is SUCH a charming book, I thought I’d share it.


Rylant’s book, The Eagle, is fantasy at its best. Three mice children are adopted by a seafaring male dog and female cat who call a lighthouse home. Two of the mice children learn to use a compass so they can explore the forest. When they lose the compass, an eagle comes to the rescue. My son truly enjoyed this story, probably because large birds have fascinated him for months.

After our yarn and paste bird’s nest was made, I figured we needed a bird to put in it – why not make an eagle?!?

I remembered seeing Always Learning’s amazing bald eagle snack and since I had leftover coconut from when we made cookies and did our baking math activity, the timing was perfect!

What you need:
Coconut
White chocolate chips
Miniature chocolate chips
Toothpick
Cashews
Chocolate snack cookies
Jumbo Marshmallows

Melt the white chocolate chips in the microwave stirring every 30-60 seconds. When melted, spread the white chocolate over the sides and top of the jumbo marshmallow (do not cover the bottom). 

Roll the marshmallow through coconut. 


Add a dollop of white chocolate onto a chocolate snack cookie and place the bottom of the jumbo marshmallow on top of it.

Take a cashew and poke it into the marshmallow to make the eagle’s beak. 

Then poke holes in the coconut-covered marshmallow with the toothpick where the eyes belong. 


Stick the miniature chocolate chips, point-side in, into the holes you poked for eyes.

Cute, huh?


Wednesday, January 18, 2012

Making a Yarn Bird's Nest


I’m not sure how it came up, but just last week out of the blue, my son mentioned the bird’s nest that we had under our deck this past summer. We were lucky that it had two sets of babies in it – first a robin, and then a squatter who took over when she and her babies vacated. It was so much fun for the boys to peer through the slats in the floorboards down onto the nest filled with eager fledglings.

I suppose it was nostalgia for those sweet moments that motivated this activity. … Well that AND this amazing yarn basket I saw on Homework. (Isn’t that breathtakingly awesome?!?)

If I picked the right color yarn and it wasn’t orderly, wouldn’t our bowl look like a nest, I thought. (Sometimes experimenting is the only way to answer a question like that.)

My son came home from school and we made some paper mache paste, following Carolyn’s recipe exactly as instructed. There was only one problem. I could have mass marketed our nests with the amount of paste we made. If you do this craft, either line up other paper mache projects to follow it, or cut the recipe down by at least a fourth.


You know what they say: a watched pot never boils. Instead of watching and waiting for the water to boil, we took a small cereal bowl and covered it in saran wrap so that no part of the outside of the bowl was peeking through. Once that was done, we were ready to move on to the next steps in the recipe (which I had my son read).


While our paste cooled and thickened, we read a wonderful book that my eyes fell in love with the second they saw it on the library shelf: Birds Build Nests by Yvonne Winer. The illustrations by Tony Oliver reminded me of John James Audubon’s prints. The book features 16 different kinds of nests from birds all over the world.


My son and I LOVED seeing how different they all were and enjoyed trying to guess some of the birds (I got the red-winged blackbird right, my son knew the peregrine falcon; the birds are identified at the back of the book).

When the book was done and the paste was cool, my son unwound a ridiculously long strand of yarn from the spool I’d purchased. Then he dunked it in a shallow bowl of the paste and stirred it, making sure it was completely covered.


Now, I have to be honest … my son hates having dirty sticky hands. I should have remembered this from our last paper mache project: the dinosaur egg we made. (sigh) But, alas, I had forgotten. It took a lot of coaxing and quite a bit of “assistance” for my son to get the yarn spread over the outside of the bowl. We left the bowl upside down on a piece of waxed paper; in 24 hours our nest would be dry.


The next day, I wedged a butter knife between the yarn and the saran wrap and eased it off its mold. Voila! Our own version of a bird’s nest!


Monday, January 16, 2012

Scrambled Schedule [Active Time-Telling Practice]


Sometimes one idea leads to another. In the process of trying to dream up a game that works on half-past, quarter-to, and quarter-after time telling, this little activity was born. It got my son out of his seat and gave him some extra practice drawing the hands on our Complete-A-Clock.

First, I made 12 cards with a variety of times from 8:30 a.m. to 3:30 p.m. Download them here (page 3 of the PDF contains 8 blank cards).

Under each time was a specific activity (e.g. do 5 jumping jacks, write your name, give a high-five, etc.). I printed the cards and scrambled them up.


I reminded my son what a schedule was. Like the routine he follows at school, it was a sequence of events that are completed at certain times. I told him that we needed to unscramble a schedule and complete the activities on it.

Then I gave my son a dry-erase marker and our laminated blank clock. I told him that the first time was 8:30 a.m. After he found that card, he drew a long and short hand on the clock to display it, and then did the activity on the card.

Now it was time to find what time and activity came next in the schedule.


My son needed a little help at first but caught on after the first three times and had a blast drawing the hands on the clock and doing each activity. See for yourself:


Friday, January 13, 2012

Contractions Down on the Farm


My son reads books with contractions all the time and comprehends the meaning of the story. But strangely enough, he doesn’t know diddley about what the contractions are short for. So I got busy trying to find a way to make this grammar lesson fun.

Denise from Sunny Days in Second Grade provided the inspiration for this activity with her
Creepy Contractions post.

I have to also give credit to Brian P. Cleary, the author of the children’s book series Words Are CATegorical. The first time I shared one of his books with my son was during our Noun Clown activity. It was a hit so I knew I’m and Won’t, They’re and Don’t: What’s a Contraction? wouldn’t disappoint.


I was right. The text was not only explanatory, but also whimsical and rhythmic. It was a great introduction to contractions!

After reading, I added two small pieces of packing tape to the windows of a barn I’d designed in Microsoft Publisher and printed on heavyweight cardstock. Download the contractions barn here.


Then I gave it to my son to color.


Afterwards, I used an Exacto knife and a straight edge to cut along all the dotted lines and scored and folded open the barn doors.


Then I cut two pieces of office paper into strips. The strips need to be slightly narrower than if you’d cut the paper in half. Tape them together end to end, to make one very long strip.
Now weave the strip through the slits on either side of the barn and fold open the barn doors. Grab a fine-tip dry-erase marker and give your child a pencil. You’re ready to start practicing contractions.


I used a list of contractions I found here. I added two words to the barn, one to each tape-covered window with the dry-erase marker. It was up to my son to figure out what letters to kick out and replace with an apostrophe to transform the two words into one contraction.

When he was done with that contraction, I used a paper towel to erase the dry-erase words, added new words, and he pulled the paper until the space behind the barn doors was blank.

My son caught on quick and was super excited with each contraction he made!

Wednesday, January 11, 2012

Penguins Printable Book & Craft


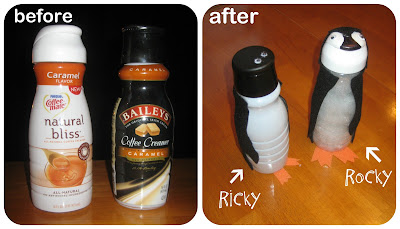
Penguins are SUCH cool birds. When I was rinsing out an empty bottle of coffee creamer I couldn’t help but notice its shape; it reminded me of a penguin’s body! When I had another bottle emptied, it was time to start our lesson in these flightless birds.

We read Gail Gibbon’s book Penguins! and learned that there are 17 species of penguins, they all live in the Southern Hemisphere, and could fly 1 million years ago.


Then I got some felt, googly eyes, polyfil, our low-temp glue gun, and two sharpie markers (black and silver). For the clear bottle, we stuffed polyfil inside it.


Then I outlined some flippers and a body using silver marker onto half a sheet of folded black felt. My son cut it out. We glued it around the bottle.


Then he cut feet out of stiffened orange felt and we glued them to the bottom. For the white-capped bottle, we added an extra hood of black felt and some black detailing with the sharpie.

All that was left to do was glue on some googly eyes. Voila! Ricky and Rocky the penguins were finished!


After the craft was done, I gave my son some blank pages I’d made so he could document all the different types of penguins. I knew he'd love this; he's STILL adding pages and birds to the printable bird lover's field guide we made last summer!

Download the blank penguin book pages I designed here.


He used the Penguin Parade guide the end of Bob Barner’s Penguins, Penguins, Everywhere! book as a guide to complete the pages, coloring the penguins to look like the pictures, writing their names, height, and where they live.


This was a great exercise in studying and recognizing all the differences in penguins!

Monday, January 9, 2012

Fridge Football [a Subtraction Scrimmage Game]


My son is getting pretty good at throwing a spiral and LOVES to support mine and my husband’s alma mater when they take to the field. To give him some subtraction practice, I created a fun magnetic football game.

First, I made and printed a football field onto two pages of sticker paper and attached it to 8 1/2- x 11-inch magnet paper (cost for a 3-pack was about $5 at my local craft store).

Download a 2-page PDF of the football field here.

Then I used one of the spoon-molded plaster shapes I had left over from our Beetle Tic-Tac-Toe and Fireflies addition game to make a football. 

My son painted it with brown acrylic paint and then I added small strips of white paper for the details using mod podge glue. I used super glue to attach two small magnets to the back.

For this 2-player game, I used two buttons with glued-on magnets to represent each player. (There are no “teams” in this game, just two opponents.) Lastly, I made several cards with subtraction problems of varying difficulty. I also added some lose-a-turn (i.e. interception) and penalty cards.

Download a 4-page PDF of the game cards here.

When my son got home from school, he read a fun, Level 1 easy reader, After-School Sports Club: Touchdown! by Alyson Heller.


Let the games begin! I attached the magnetic field to the refrigerator and put the football and players (aka magnetic buttons) on the 50-yard line.

Once the cards were shuffled, I had my son toss a coin to see who went first: him or me. When he won the coin toss, he drew the first card from the pile, answered the problem, and moved his button magnet toward one of the endzones. (Each card displays the number of yards you earn with the correct answer; it's inside a small football in the lower left corner. More yards are earned for harder problems.)


Since the field is marked in increments of two, this proved to be an excellent exercise in skip counting by twos as well as subtraction practice!

The card was returned to the bottom of the pile. Now it was my turn. Play continued like this, with the football being moved next to the button of whoever’s turn it was. My son jumped up and down when either one of us drew the penalty or lose-a-turn cards; he was really into the game!


TOUCHDOWN! Whichever player gets his button (and the ball) into the endzone first wins. We played this game three times, until we finally had to stop so I could start making dinner.

When my husband came home, the first words out of my son’s mouth were, “Dad, can we play our new football game?” They played two MORE rounds after dinner!!

Friday, January 6, 2012

Paper Word Chains


The spelling words just keep on a ’comin. I hope I don’t run out of creative ways for my son to practice them anytime soon! So far, he’s gotten perfect scores on the post-tests his teacher is giving each week. (Keep your fingers crossed!)

Simply reading the words on his spelling list and having him write them never goes well. [Imagine copious amounts of whining.]

When I read another blogger’s post about how all kids like making paper chains, I recalled the few other times he’d made them and realized that she was speaking words of profound wisdom!

So when my son came home toting a short list of the week’s spelling words, I was ready. I’d cut what seemed like a zillion strips of colored construction paper (okay, I may be exaggerating a bit; there were more like 30).

While he tossed back some fruit snacks, I used a permanent marker to write one letter of each word from the list onto every strip. Then I scrambled the strips, and handed him the pile along with the stapler.

I told him to lay out the strips so he could see all the letters. Then I read the first word on his spelling list: dog. (The words get progressively harder.) He grabbed a strip with a d, an o, and a g and put them in order.


Then I reminded him how to make a paper chain. Just like the blogger had said, he was positively giddy at the mere mention of doing this.

One by one, he worked through each of the words, making several small chains, until the grand finale, when he made yesterday into a chain. “Did I get it right, Mom?” he asked.


“Yep, that’s how you spell yesterday,” I responded. To which, he exclaimed loudly, “WOO HOO!”

Before we finished for the day, he stretched out the chains, putting them in order from longest to shortest along the table’s edge – yesterday at the beginning and dog at the end.


Later that night, he added loops between each word chain to make one very long necklace. I’d wish that he could wear it for his post-test, but after this activity, I just don’t think he’ll need it.


TIP: If you do this activity with your child, be sure to put a line under letters like n and u because if the strips get turned upside down, the letters could easily be confused! 

NOTE: It's easy for the letters once added to the chain to appear upside down. I didn't worry about this; after all, it's the spelling and order of the letters that's most important.