Friday, June 28, 2013

Division 1 Racing [Printable Math Game]


Our youngest son is really into those little metal Hot Wheels and Matchbox cars lately. It seems they're everywhere I turn in our house right now. It's not a wonder when I saw our two sons making a pretend race with them, that the wheels in my brain started turning. How could I make this imaginative play educational too?

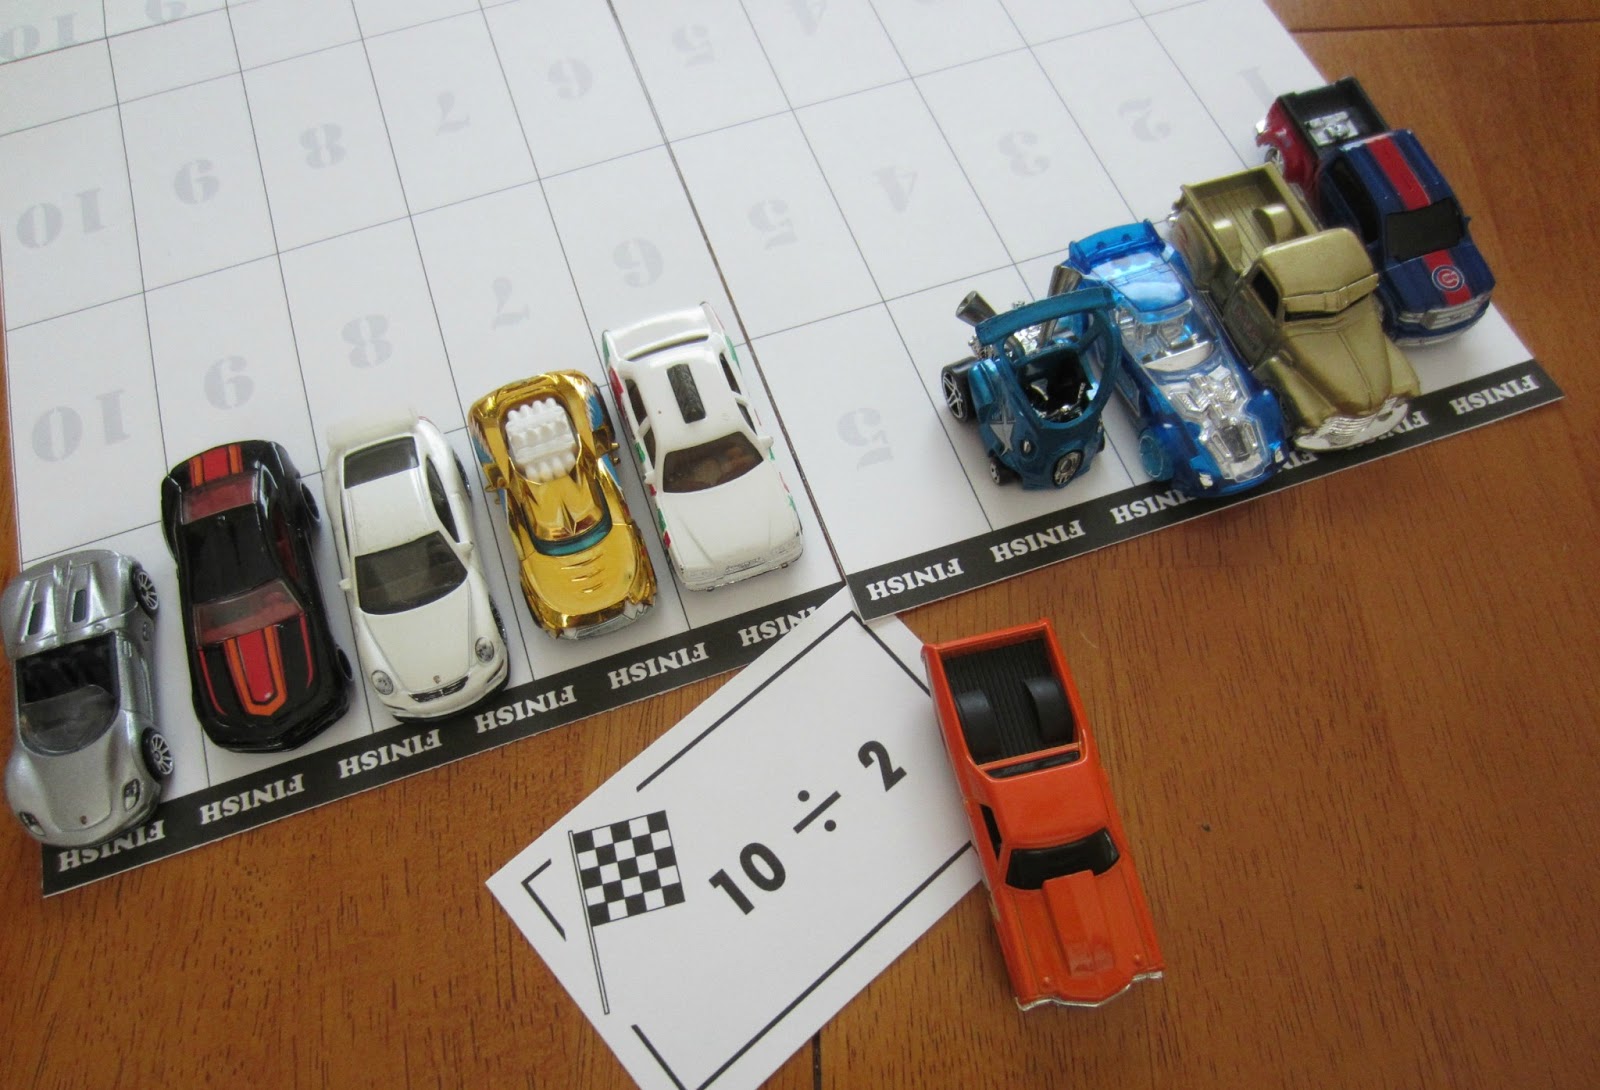
This Division 1 Racing game is the result.

What You Need
10 small toy cars
Division 1 Racing track (Download it here; cut and tape together.)
Division 1 Racing playing cards (Download it here; this 13-page PDF has 100 division problems. Print and cut the cards apart.)
Division tables (for when kids get stumped; we used the one here)


How to Play
For multiple players, decide who's racing what cars in which lanes. When my son and I played, he chose the odd-numbered lanes and I raced the cars in the even lanes.


We took turns drawing a card, answering the problem and moving the car that was in the same numbered lane as the answer. For example, if I drew the card 24 divided by 8, I moved the car in lane 3 up one space. It didn't matter that my cars were in the even lanes; we moved each other's cars. 


The object was to answer the problems correctly and watch to see which car would cross the finish line first.


My son shocked me. This game held his interest for a lot longer than I'd imagined; I think we played for nearly 40 minutes! We answered nearly all of the problems before the car in lane 5 won the race. What fun!


This game could easily be played with multiple players - as many as 10 or more if they were solving problems as teams. If your child is playing alone, consider making the track shorter to keep them from getting fatigued and frustrated before the race is won.

By the way, our preschooler has gotten a dose of some educational play with his cars too, namely sorting by color and counting. I'd say we've gotten our money's worth out of these toys!

Wednesday, June 26, 2013

Balloon-Powered Pinwheel


Have you seen this phenomenal idea on Pinterest? It's from the NASA Teacher's Resource Center. In case that didn't convince you that it was awesome, allow me to try.

My oldest son was in a funk and promptly informed me that he did not want to do an activity when he got home from summer camp. But that was before I pulled out the supplies and set them in front of him:

Pencil with a good eraser
Sewing push pin
Drinking straw (the kind with a bendable end)
Balloon
Tape

Curiosity won out and his bad case of the grumps vanished.

First he blew up the balloon to stretch it out. Then he put the straw (the end opposite the bend) into the neck of the deflated balloon. We used scotch tape to secure it in place.


Now he held out his finger to figure out where the balance point was with the balloon-ended straw on it. This was the place where the sewing pin was inserted.


We pushed it down through both sides of the straw and into the pencil's eraser. Then we spun it around a few times to loosen up the hole a bit.


My son was still stumped. I told him to put the bent end of the straw into his mouth and blow up the balloon. Then release it and watch what happens.


Around and around the straw spun on its axis. And again and again, he blew up the balloon to watch it. He was fascinated!


This isn't the first time we've used balloons to propel something. (Check out our squid!)

Monday, June 24, 2013

After School Linky Party (6/24)

Welcome to the After School Linky!


Well, I thought I'd just feature three amazing ideas and activities
from last week's party and I blew it.
Again.
But that's a good thing. Here are SIX of my favorites.


The Skeleton (2 Puzzle 1) by Caminem Plegats.
(Hit the translate button folks. It's worth it. This blogger made a life-size skeleton puzzle for her child. Anatomy just got interesting!) 


Milk Cap Math: MADS Elimination at love2learn2day.
(Math fact practice is boring no more. I LOVE this game!)


Art + Science = Sun Prints at Creative Family Fun.
(Here, I thought I had to have amazing leaves and special art paper to make sun prints.
Not so!)


Elementary Teachers Share Their Favorite Children's Books at Buggy and Buddy.
(This is a great list separated by grade level. Time to hit the library!)


Fireworks in a Jar by Gift of Curiosity.
(Chances are good that you've got everything you need in your kitchen to generate some oohs and ahhs from the kiddos!)

Patriotic Goldfish at Lory's Page.
(Lory has a freebie that turns one of kids' favorite snacks into a lesson in estimation, tally marks, counting, sorting, graphing, addition, etc. Talk about July 4th fun!)


Relentlessly Fun, Deceptively Educational

We would love to have you link up your School-Age Post (ages 5 and up) about your learning week after school including Crafts, Activities, Playtime and Adventures that you are doing to enrich your children's lives after their day at school, homeschool or on the weekend! When linking up, please take a moment to comment on at least one post linked up before yours and grab our after school button to include a link on your post or site! By linking up you're giving permission for us to share on our After School Pinterest Board or Feature on our After School Party next week! Don't forget to follow along and join our After School Enrichment Community.

Friday, June 21, 2013

Paint Strip Ocean Depths [Read and Record]


Are your kids fans of The Cat in the Hat's Learning Library books? We are!

This activity was inspired by Bonnie Worth's Wish for a Fish: All About Sea Creatures. This phenomenal installment of the Cat in the Hat books takes readers down deep in the sea to explore the five ocean levels.


Of course it rhymes, has playful images, and teaches kids about ocean life in a way that is whimsical and fun; for example, "A shark grows its teeth in neat rows in its face. When the front row wears out, the next row takes its place." Cool, huh?

As my son and I read the book, he labeled a worksheet with a glued on paint sample strip that I got at the hardware store (it's really two glued together since each only showed four colors and I needed five). 


The ombre effect of lightest to darkest blue hues was perfect for illustrating the sunny zone all the way down to the trench!! If you've got an artistic kid, have them draw some of the plant and animal life typical to each level - or use stickers!


Download the worksheet I made here. Glue on your paint strip. And read Wish for a Fish!

Wednesday, June 19, 2013

2 DIY Craft Stick Harmonicas


Homemade instruments are always a hit at my house (check out our piano, drums, guitar, flute, and palm pipes for proof).

When I saw two blogs share ways to make a harmonica from jumbo craft sticks, I knew that my son and I had to give it a try. I thought we'd have a harmonica face-off to see which was better. Truth be told, both were amazing. There ARE differences, though.


No. 1
(This idea came from Housing a Forest.)

SUPPLIES:
2 Jumbo Wooden Craft Sticks
2 Skinny Rubber Bands
Paper (cut down to a strip to roughly the same size as a craft stick)
2 Toothpicks (cut each to the width or slightly wider than the craft stick)

ASSEMBLY


  1. Make a sandwich out of your paper and craft sticks with the paper in between.
  2. Wrap a rubber band around one end of the sandwich until it is secure.
  3. Slide a toothpick into the craft stick sandwich beneath the paper, until it is positioned just inside the rubber band.
  4. Place the other toothpick on the opposite end of the craft stick sandwich, this time placing it on top of the paper.
  5. Wrap the end with the remaining rubber band.

Hold the "harmonica" up to your mouth and blow air out through it to make noise.


No. 2
(This idea came from Montessori Tidbits, courtesy of Mom to 2 Posh Lil Divas.)

SUPPLIES:
2 Jumbo Wooden Craft Sticks
1 Wide Rubber Band
2 Skinny Rubber Bands
Paper (cut two strips about 3/4- x 3-inches each)
Clear tape

ASSEMBLY

  1. Place one craft stick on top of the other. Wrap a strip of paper snugly around each end of the sticks. Secure with tape. (Make sure the tape does not touch the sticks.)
  2. Slide one craft stick out, leaving the paper and other craft stick in place.
  3. Stretch the wide rubber band around the length of the craft stick with the paper strips.
  4. Place the other craft stick on top of the papered and rubber banded stick. Secure the sticks together at the ends using the skinny rubber bands, placing each just to the outside of the paper.

Hold the "harmonica" up to your mouth and blow air out through it to make noise.

My son was surprised that each made such a unique sound - sort of like a kazoo.

When he was done making some funky music with his new instruments, we read a book about a boy whose uncle (Booker T.) teaches him to play the harmonica. It was the perfect story to pair with this craft!

Monday, June 17, 2013

After School Linky Party! (6/17)


Welcome to the After School Linky!


Last week's party had some great advice, fun activities, and useful lessons.
I love the diversity! Here are some of my favorites from last week.


Top 10 Flash Card Games and DIY Flash Cards at True Aim.
(Traditional flash card study has always elicited moans and groans here.
That's why I LOVE these ideas for making flash cards fun!)


Make a Marshmallow Shooter for Father's Day Fun at B-Inspired Mama.
(I've made these and its the best cheap fun on the market.
Girls and boys alike - of ALL ages - will LOVE this!)


Cotton Reel Car at Science Sparks.
(This is equal parts fun and engineering. Awesome!)


Shadow Science at Homeschool Escapade.
(Shadows have long since fascinated kids. Zelda turned observations into education. Genius!)


Shoes and Learning to Tie Them! by Growing Book by Book.
(Tying shoes is h-a-r-d! This list of books is great to prep your child.)


When There's An Active Shooter in a Public Place at Creekside Learning.
(While we never want to imagine we'll be in a position to need this advice,
it's great that someone is offering it. Thanks, Julie!)


Relentlessly Fun, Deceptively Educational

We would love to have you link up your School-Age Post (ages 5 and up) about your learning week after school including Crafts, Activities, Playtime and Adventures that you are doing to enrich your children's lives after their day at school, homeschool or on the weekend! When linking up, please take a moment to comment on at least one post linked up before yours and grab our after school button to include a link on your post or site! By linking up you're giving permission for us to share on our After School Pinterest Board or Feature on our After School Party next week! Don't forget to follow along and join our After School Enrichment Community.

Friday, June 14, 2013

Proofreading with DIY Punctuation Stamps


What is it about stamps? I've known for years that the most mundane learning activities seem less of a chore when there's an ink pad involved (for evidence, check out our Missing Letters Mystery). Don't ask me why.

To practice punctuation, we reviewed seven punctuation marks: apostrophe, comma, exclamation point, period, colon, and semicolon.

In order to do this, we read Punctuation Takes a Vacation, a clever book about a classroom of students that get a taste of life without any punctuation. This is my favorite kind of children's book - non-fiction disguised as fiction with playful graphics and a creative storyline. I enjoyed it as much as my son did.


And just as importantly, it was the perfect complement to this activity.

I printed two pages of sentences with missing punctuation. Download them here.


Then I made some punctuation stamps.


These were surprisingly easy. I used six wine corks that I'd been saving for ages (a friend mailed me a gift and used them as packaging), six 1-inch wooden discs, 3mm craft foam, and a low-temp glue gun.

I cut the punctuation marks out of the foam, using a hole punch when possible to get perfect circles, and glued them to the wooden discs. Then, I glued each disc to a cork. NOTES: Make sure your stamps are the mirror image of your punctuation marks. Also, you only need one stamp for the comma and apostrophe.

When it came time to fix the missing punctuation on the sentences I'd prepared, my son was ready. He moved through them quickly, only stopping a few times to ask questions for help.


He happily stamped and stamped and stamped.

Wednesday, June 12, 2013

Catching and Plotting Rainfall


If you're on Pinterest, you've seen this amazing rain gauge project. The simplicity, short material list, and learning opportunity have made it a favorite among kids and parents for years - my son and I included.

To make it you'll need a clear plastic bottle (like a 2-liter soda bottle) or a large water bottle. We used a Smart Water bottle. Remove the label. Have a ruler, scissors, and a permanent fine-tip marker handy.

Cut the top of the bottle off with a knife or scissors; young children should leave this up to grown-ups to do. Now align a ruler so the end of the ruler is at the bottom of the bottle and make small marks with the marker up the side of the bottle where the inches or centimeter lines are.

Now take the top of the bottle and place the spout upside down inside the bottle. With a little pressure, it will fit snugly.

Head outside and find the ideal spot to place your rain gauge (away from trees, etc.). Dig a shallow hole and secure the bottle inside it.

Now wait … and wait … and wait. Apparently making a rain gauge was just what we needed to chase away the stormy skies. While this spring has been extremely wet (parts of our city were sandbagging two weeks ago as the river threatened to exceed its banks), since my son made his rain gauge, not a drop has fallen. (What's that they say about the best laid plans?)


When it does, though, he'll be ready with this Daily Rain Record.

Each day, he'll plot the amount our rain gauge catches by drawing a dot on the line. Then he'll check all the boxes that apply to the type of rainfall (e.g. mist, downpour, shower).

Download a PDF of this Daily Rain Record free here.

When he has seven days of data, he'll draw lines between the dots, total the rainfall, and find the average by dividing the total by seven.

You didn't think I was just going to make this a science lesson did you? (he he) I just had to sneak a little math in.

Looking for a great book to read to pair with this activity? We read Elizabeth Miles' Watching the Weather: Rain. It covered why we need rain, helped us review the water cycle, and explained drought, floods, and acid rain - all in terms a soon-to-be third grader could understand.

Monday, June 10, 2013

After School Linky Party (6/10)

Welcome to the After School Linky Party!


Last week's party had such a great mix of ideas and activities - ways to learn the alphabet, enjoy the summer, and keep learning math, science, and language arts.

Here are just a handful of my favorites from last week's party!

Perspective from ArtClubBlog.
(This art project shows kids how perspective changes based on distance or viewing angle.
Even left-brained kids will love this!)


What Causes a Thunderstorm? at Life with Moore Babies.
(Kids get to make their own thunderstorm in a clear box! SEE the science? It's awesome!)


Bullseye Ball Math Busy Bag at Finding the Teachable Moments.
(This portable game is simple to put together and great at sneaking in math.
Even the storage bag is a manipulative!)


Hopscotch Learning at Homeschool Escapade.
(Learning sight words just got a whole lot more fun with sidewalk chalk.
Perfect for kinesthetic learners!)


Say & Color: Antonym Avenue (FREEBIE) at Speech Time Fun.
(Before kids get coloring, they have to express an antonym for the words listed. Great free printable!)


Vacation Workstation...A Brain Playground by love2learn2day.
(A simple file folder has been transformed into the ultimate summer learning guide!)


Cohosted by
Relentlessly Fun, Deceptively Educational

We would love to have you link up your School-Age Post (ages 5 and up) about your learning week after school including Crafts, Activities, Playtime and Adventures that you are doing to enrich your children's lives after their day at school, homeschool or on the weekend! When linking up, please take a moment to comment on at least one post linked up before yours and grab our after school button to include a link on your post or site! By linking up you're giving permission for us to share on our After School Pinterest Board or Feature on our After School Party next week! Don't forget to follow along and join our After School Enrichment Community.

Link up your After School Activities, Crafts and Adventures! We'd love to see them!

Friday, June 7, 2013

Drop, Pop, & Measure [Math with Pom Pom Poppers]


Some activities are a sure thing when it comes to fun. This is one of them. I knew it from the second I saw the Pom Pom Poppers made by Laura at Come Together Kids.

Supplies you need are scissors, plastic disposable drinking cups (two per popper), balloons (one per popper), and some pom pom balls.

Nest two cups together, one inside the other (two cups provides more stability). Cut the bottom third of the cups off with scissors and discard. Now take a balloon and tie it closed (do not inflate). Cut the tip of the balloon off (the end opposite the knot). Stretch the balloon over the rim (not the cut side) of the two cut plastic cups. Laura's tutorial is amazing; check it out here.


Once the poppers were ready, my sons could barely contain themselves. My oldest boy's mouth was like a machine gun shooting out question after question. "What are we going to do with these?" "They're drums right?" "Is it another kind of instrument?"

Without uttering a word, I grabbed a bag of pom poms, dropped one in the cup, pulled the tie on the balloon back and popped the ball into the air.

My sons' eyes got big and their chins dropped.

I grabbed a measuring tape and some blue painters tape to make a line to stand behind. The goal was to see who could launch a pom pom the farthest.


My oldest son recorded the distances in inches.


The simple act of documenting the launch distances had so many wonderful lessons:
  • How many pom poms of any given color were launched?
  • Can you turn those inches into feet?
  • Can you put them in order from least distance to greatest distance?
  • How much farther did your farthest pom pom go than the next farthest, etc.?
  • What was the average distance of your pom poms?

As we continue to get hammered with more and more rain, I was thrilled to provide an indoor learning activity that provided so much fun!